Monday 20 June 2011

Bird cage cake

Bird cage cakes are very popular at the moment and after seeing so many gorgeous ones in magazines and online i decided to give it a go myself. Many many hours were spent making and decorating this cake.

The cake is made up of 3 seperate cakes with two 6" cakes making up the base and another cake for the dome of the cage. The cake is then decorated with roses and a little fondant bird perched on the top of the cake.

If you want to try and create your own bird cage cake Zoe Clark Cake decorating at home book has a very good tutorial.
 

Sunday 13 February 2011

Enchanted Garden Dessert Table


Over the last few months I have become a massive fan of dessert tables and spend hours trawling the internet for inspiration. My biggest inspirational source is from Amy Atlas and Hostess With The Mostess.

Our enchanted garden dessert table was designed for a 5 year olds birthday party. This dessert table was filled with a 2 tier cake topped with flowers, butterflys and toad stalls, fizzy jelly, butterfly gingerbread cookies, cupcakes, meringues topped with raspberries, coconut ice, pink lemeonade and sweets.


Each guest had a party bag to take home. The Happy Birthday banner was designed by TomKat Studios and the party bag labels and food labels were designed by myself and available to buy from our online shop.


Sunday 6 February 2011

Key Lime Pie


Its been a while since I last updated this blog so I thought I would share with you our key lime pie receipe which I have been working on. We have recently introduced a range of pies and cheesecakes for you to buy from our website.


What you'll need

For the filling
8 egg yolks
2 x 397g tins of condensed milk
freshly squeezed juice and zest of 5 limes
450ml of whipping cream

For the crust
500g digestive biscuits
200 g melted unstalted butter

10" pie dish or a removeable bottom cake tin


Step One
Preheat the oven to 170C or gas mark 3

Step Two
Roughly break up the digestive biscuits and then place them in a food processor and blitz until finely ground. Pour the melted butter into the biscuit and mix.

Step Three
Press the biscuit mixture to the base and the sides of your cake tin or pie tin. Use the back of a spoon to compress the mixture to make a flat even surface.

Step Four
Bake in a preheated opven for about 20 minutes or until deepply golden and firm. Set aside and cool. Turn down the oven to 150 C or Gas Mark 2

Step Five
Put the condensed milk, lime juice and zest, and condensed milk into a glass bowl and mix gently untill all the ingredients are mixed well. The mixture will thicken naturally.

Step Six
Pour the mixture into the cold pie crust and bake in a preheated oven for 30 minutes. The filling should be firm to the touch but slightly soft still in the middle. Leave to coll and then refridgerate for at least an hour but preferably overnight.

Step Seven
When ready to serve whip the cream with an electric whisk and then spread over the pie. Decorate with  lime zest and Enjoy!

Wednesday 29 December 2010

Cake pops

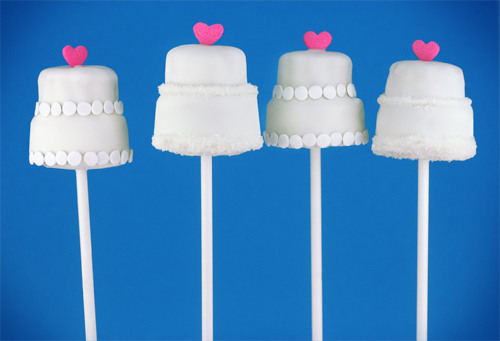
We are into cake pops in a big way at the moment and am loving Bakarellas new book which give  DIY instructions on making cake pops. Below we have included step by step instructions on making wedding cake cake pops all courtesy of Bakerella! (A great site if you like baking as much as I do.)


Read the basic instructions for making cake pops, and then use following directions to turn them into miniature wedding cakes.

Wedding Cake Cutters
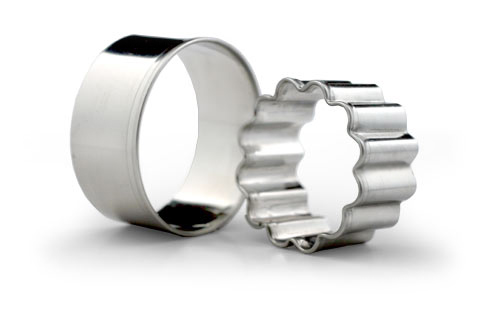
After you have rolled out the cake balls, use two different size cookie cutters to make the shapes. You can use small cutters like these to shape the cake and frosting mixture.
They’re not too big … the round cutter is about 1 1/2 inches wide and the crinkle cutter is about 1 1/4 inches wide.
Press one cake ball into each mold until the mixture fills up the cookie cutter shape. Remove any excess and you can reuse.
Wedding Cakes
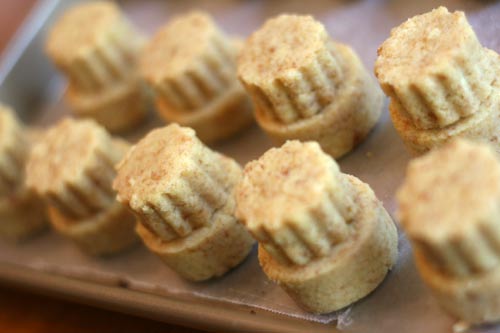
Remove mixture from the cookie cutters carefully so the shape stays intact and place on a wax paper-covered baking sheet.
When you have your shapes made, melt white candy coating per the directions on the package. Apply a thin layer of coating to the bottom of the smaller shaped cake, leaving the center uncoated. (This will make it easier for the lollipop stick to be inserted.)
Then place the small layer on top of the larger layer, coating side down. Press gently and let the candy coating set like glue. Place cakes in the refrigerator to keep chilled before dipping.
When you are ready, dip the tip of each lollipop stick in coating and then insert into the bottom of the cake about halfway. Then dip the wedding cake pop in a small narrow bowl of melted candy coating so that you can dip and remove the entire cake in one motion.
To make sure the coating is fluid enough, you can add some shortening or paramount crystals to help thin it out.
Remove from the candy coating, tap off any excess gently and place a jumbo heart sprinkle on top before the coating sets.
Let dry in a styrofoam block and then attach decorations using more melted candy coating like as glue. You can use sugar crystals, confetti sprinkles or even pipe on details like dots or swirls with more candy coating. You could really go all out with different decorations and colors.
Jumbo heart sprinkles
These jumbo heart sprinkles work out great for the top of the cakes.
Just look how simple and sweet these are.
Wedding Cake Pops

Tuesday 28 December 2010

Welcome

Welcome everyone to our new blog where we will be posting our favourite recipes, tutorials, pictures of our own designs and our favourites pictures from around the world.